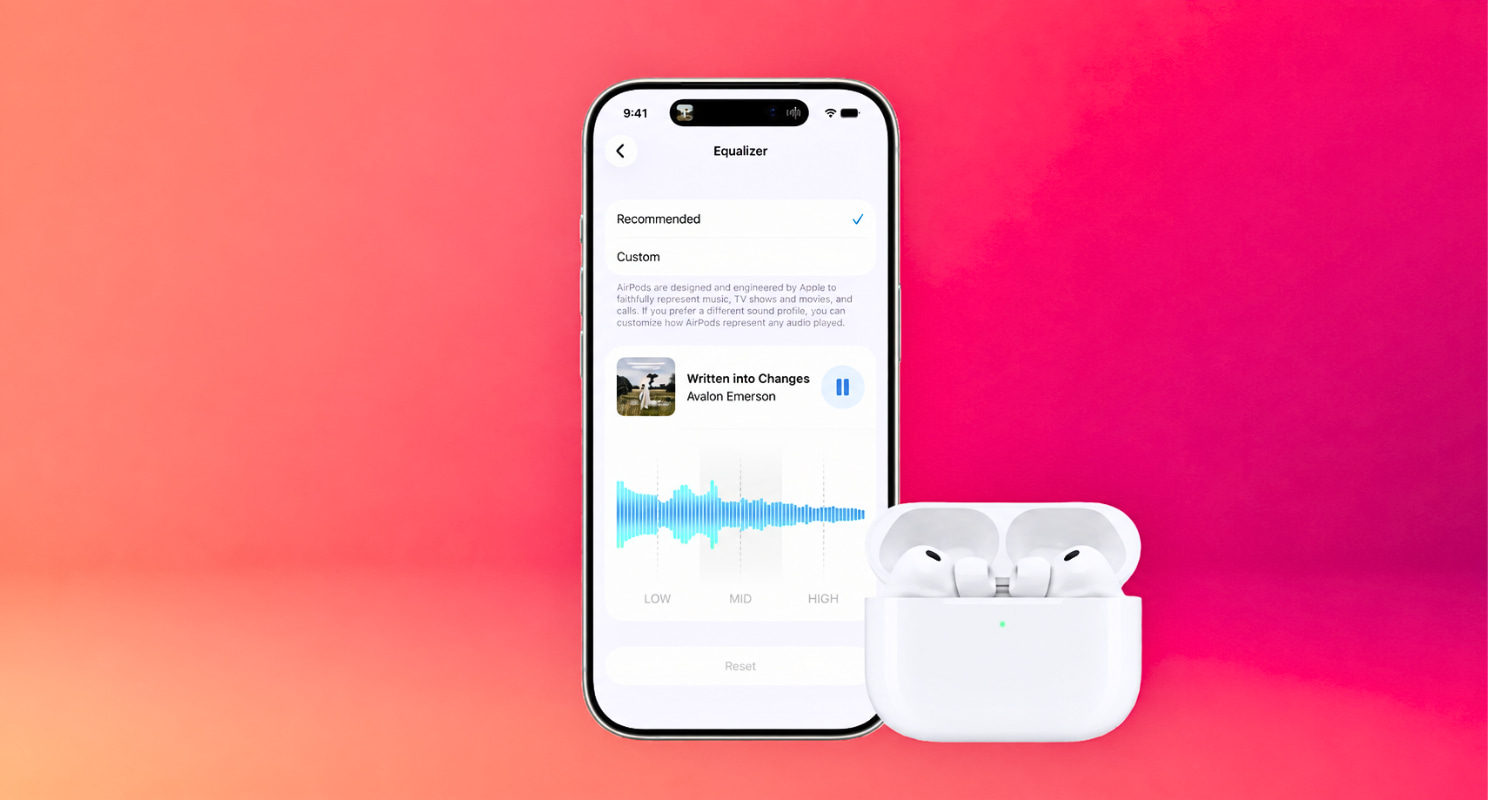
Apple is finally giving AirPods users more control over how their audio sounds. The new AirPods Custom Equalization (EQ) feature in iOS 27 lets listeners adjust low, mid, and high frequencies instead of relying entirely on Apple’s default tuning. This added control can help reduce overpowering bass, improve vocal clarity, or soften uncomfortable treble.
Earlier iPhone sound controls offered less flexibility. Apple Music provided fixed presets such as Rock, Jazz, Acoustic, and Bass Booster, while Headphone Accommodations focused mainly on hearing and accessibility preferences. Apple’s official iOS 27 preview confirms that the new AirPods Custom EQ provides individual controls for lows, mids, and highs within AirPods settings.
Although the equalizer has only three controls, each can noticeably change the listening experience. SoundGuys’ laboratory measurements found that the bass slider affects lower frequencies, while the treble slider affects higher frequencies. Once you understand how these controls work, the next step is knowing where your AirPods are and how to locate their case when you need them.
How to Set Up Apple’s AirPods Equalizer
1. Confirm Your AirPods Support Custom EQ
Apple limits Custom EQ to selected AirPods models. According to Apple, the feature currently supports:
Apple does not currently list AirPods Pro 1, AirPods 3, AirPods 2, or the original AirPods Max as compatible. These models can still use Apple Music EQ presets or Headphone Accommodations, but they may not receive the dedicated three-band equalizer.
Compatibility details may change while iOS 27 remains in beta. Check Apple’s final release documentation before assuming that a specific AirPods model supports the feature.
2. Update Your iPhone and AirPods
Install iOS 27 on a compatible iPhone before searching for Custom EQ. As of August 2026, the feature remains part of the iOS 27 beta experience, so users who prefer stable software may want to wait for the official public release.
Your AirPods also need compatible firmware. Connect them to the iPhone, place them inside their charging case, connect the case to power, and keep it close to the iPhone with Bluetooth and Wi-Fi enabled.
AirPods firmware normally installs automatically in the background. Apple does not provide a standard button that forces an immediate firmware update.
If you cannot find the charging case, follow these steps to locate a missing AirPods case before attempting the firmware update.
3. Connect Your AirPods Correctly
Put your AirPods in your ears and confirm that the iPhone shows them as connected. Open Control Center and check that your AirPods appear as the current audio output device.
If they repeatedly disconnect, open Bluetooth settings, forget the AirPods, and pair them again. You can also follow this guide to fix common headphone connection problems before changing any audio settings.
The complete AirPods settings menu may not appear when the earbuds remain inside a closed case. Wear them during setup so you can hear each equalizer adjustment immediately.
4. Open the AirPods Equalizer
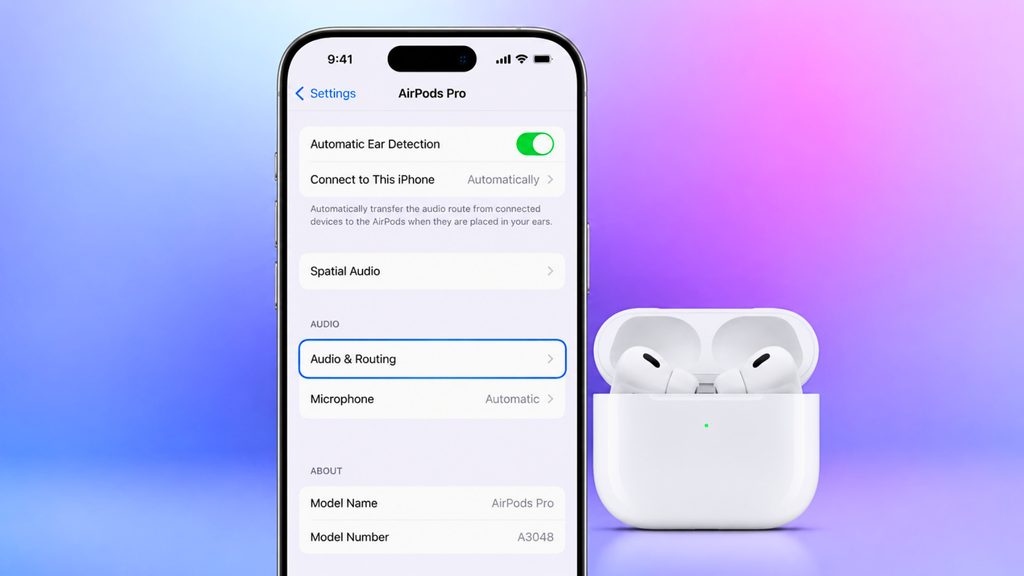
Open Settings while wearing your connected AirPods. Tap the AirPods name near the top of the screen.
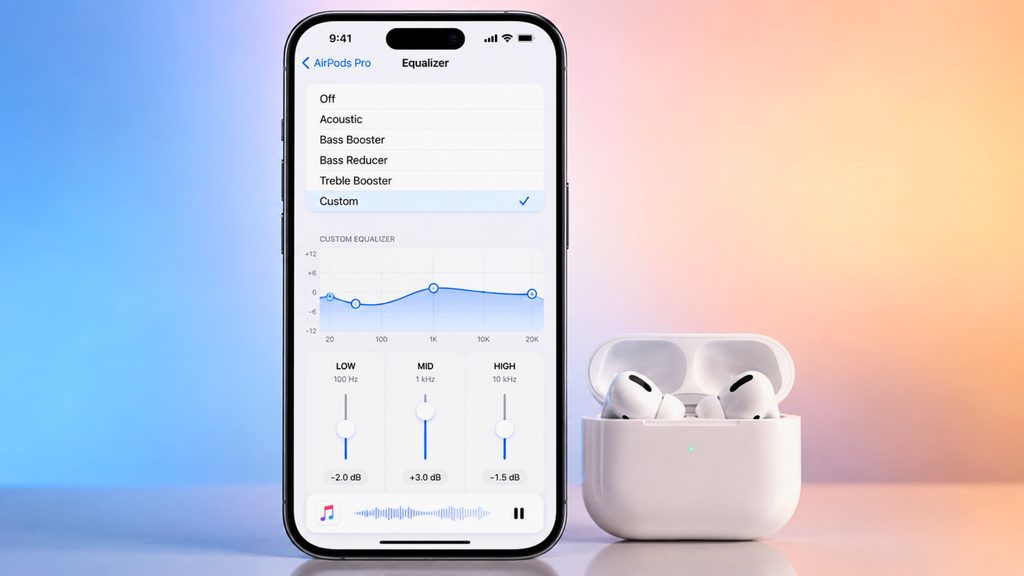
Select Audio & Routing, then tap Equalizer. Choose Custom to access the separate Low, Mid, and High controls.
The exact wording or location may change before Apple releases the stable version of iOS 27. If the Equalizer option does not appear, confirm your iOS version, AirPods firmware, and model compatibility.
5. Start With Apple’s Recommended Profile
Select Recommended before changing any controls. Listen to a familiar song, podcast, movie scene, or audiobook so you can establish a reliable reference.
Apple designs its standard sound profile to work with different types of media. You may find that Recommended already sounds balanced enough for everyday listening.
Switch to Custom only after identifying a clear problem. For example, you might notice excessive bass, recessed dialogue, thin vocals, or uncomfortable treble.
6. Adjust One Frequency Band at a Time
Change only one slider before replaying the same section of audio. Moving all three controls together makes it difficult to identify which adjustment improved or damaged the sound.
- Adjust Low to change bass weight, kick drums, bass guitars, and deep movie effects.
- Adjust Mid to change vocals, dialogue, guitars, keyboards, and the main body of many instruments.
- Adjust High to change brightness, cymbal detail, vocal sibilance, and upper-frequency clarity.
Begin with small movements. Apple’s interface does not provide precise values or numbered tick marks, which makes extreme changes difficult to reproduce accurately.
Return each control to its original position before testing another frequency region. This method helps you understand exactly what each slider changes.
7. Test the Equalizer With Familiar Audio
Choose a recording you have heard many times through different headphones or speakers. Familiar audio makes changes in vocal tone, bass weight, and brightness easier to recognize.
Use a track that contains clear vocals, controlled bass, and detailed high-frequency instruments. Podcasts can also provide a useful reference when you want to improve speech clarity.
Keep the volume consistent during every comparison. Changing the volume while adjusting the equalizer can alter your perception of bass and treble.
8. Compare Different Types of Content
A profile that improves one song may not work equally well with podcasts, movies, or calls. Test several types of media before deciding to keep your settings.
Music reveals bass depth, vocal presence, and treble detail. Podcasts and audiobooks provide a clearer test of speech, while movies show whether dialogue remains understandable during loud effects.
Avoid creating an entire profile around one poorly mixed recording. If only one track sounds harsh or muddy, the recording may cause the problem.
9. Save a Visual Reference of Your Profile
Take a screenshot after finding settings that sound comfortable. The current equalizer interface does not show precise numerical values, so a screenshot provides the easiest way to preserve your slider positions.
You can save separate screenshots for music, podcasts, movies, or quiet listening. Even if Apple does not offer named custom presets, these images can help you recreate useful profiles.
Return to Recommended whenever you become unsure about your changes. It provides a consistent baseline for new comparisons.
What to Do When the AirPods Equalizer Sounds Wrong
Understand How the Low Control Changes Bass
SoundGuys’ measurements suggest that the Low control behaves like a shelving filter around 150 hertz. Increasing it raises much of the deep bass below that point, while decreasing it reduces low-frequency weight.
A small increase can make kick drums, electronic bass, and movie effects sound fuller. Too much boost can cover vocals, reduce detail, and create an uncomfortable pressure-like presentation.
Reduce Low slightly when your AirPods sound boomy at normal or quiet volume. Avoid using a large boost to compensate for a poor ear-tip seal because the physical fit may cause the missing bass.
Understand How the High Control Changes Treble
The High control appears to operate like a shelving filter around 5 kilohertz. SoundGuys measured approximately +8 to -7 decibels of adjustment in this region.
Increase High slightly when recordings sound dull or lack definition. Decrease it when cymbals, consonants, or electronic details become sharp or tiring.
Treble sensitivity differs between listeners. A setting that sounds detailed to one person may sound piercing to another, especially at high volume.
Treat the Mid Control Carefully
The Mid slider does not behave like a traditional fixed-frequency control. SoundGuys found that the maximum boost centered near 1.4 kilohertz and added approximately 5 decibels, while the maximum cut centered near 875 hertz and reduced the level by about 10 decibels.
This changing center frequency can produce unexpected results. A small boost may bring vocals and dialogue forward, while a stronger boost may make voices sound nasal or congested.
A large cut can make vocals sound distant, hollow, or disconnected from the music. Use smaller movements with the Mid control than you use with Low or High.
Build a Profile Around a Clear Goal
Identify the sound problem before moving a slider. Avoid changing every control simply because the equalizer provides that option.
- Reduce Low when bass overwhelms vocals or dialogue.
- Increase Low when the ear-tip seal feels secure but music sounds thin.
- Increase Mid slightly when speech lacks presence.
- Reduce Mid slightly when vocals sound congested or nasal.
- Reduce High when cymbals and consonants sound piercing.
- Increase High when recordings sound unusually dull.
These suggestions provide starting points rather than universal presets. Your hearing, listening volume, AirPods fit, and favorite content will affect the final result.
Prevent Multiple Equalizers From Stacking
AirPods Custom EQ can combine with Apple Music EQ, Headphone Accommodations, or an equalizer inside another streaming application. Stacking several audio filters may exaggerate frequencies, reduce clarity, or introduce distortion.
To isolate Custom EQ, open Settings > Apps > Music > EQ, then select Off. Apple confirms this location in its iPhone sound-quality guide.
Check Spotify, YouTube Music, or another streaming application for additional equalizer settings. Disable those controls temporarily while creating your AirPods profile.
Once the AirPods profile sounds balanced, activate other features one at a time. This process helps you identify any setting that causes harshness, distortion, or an unnatural tonal balance.
Distinguish Custom EQ From Headphone Accommodations
Custom EQ changes low, mid, and high frequencies according to your preferences. Headphone Accommodations focuses on making softer sounds and specific frequency ranges easier to hear.
Apple’s Headphone Accommodations instructions let users select Balanced Tone, Vocal Range, or Brightness. The feature can apply to media, phone calls, FaceTime, and supported communication applications.
Using both systems may create stronger adjustments than expected. Turn off Headphone Accommodations while testing Custom EQ, then enable it later if you need its accessibility-focused changes.
Distinguish Custom EQ From Adaptive Audio
Custom EQ changes tonal balance. Adaptive Audio manages environmental sound by blending Transparency and Active Noise Cancelation (ANC).
Personalized Volume can also change the playback level according to environmental conditions and learned listening preferences. Conversation Awareness lowers media volume and emphasizes nearby voices when you begin speaking.
Apple explains these features in its Adaptive Audio support guide. Keep them active if you find them useful, but remember that automatic volume changes can affect how you perceive your equalizer profile.
Compare the Sound at Different Volumes
AirPods Pro 3 use Loudness-Dependent Equalization (LDEQ), which changes tonal balance according to the listening level. SoundGuys found that bass and treble can become more prominent at quieter volumes.
If your AirPods sound boomy and bright at low volume, reduce Low and High slightly. If they sound balanced at moderate volume but harsh when turned up, remove strong boosts instead of continuing to increase the volume.
Test at your normal listening level first. Then reduce and increase the volume slightly to confirm that the profile remains comfortable.
Avoid Extreme Boosts at High Volume
Large equalizer boosts require additional headroom from the audio signal. Strong boosts across several bands can make the signal sound compressed, rough, or distorted.
SoundGuys noticed a small amount of upper-frequency distortion with the equalizer enabled during testing, although the effect remained difficult to hear. Combining strong Custom EQ adjustments with another application equalizer may increase the problem.
Reduce boosted bands if the audio becomes harsh or unclear. Lowering an unwanted frequency often produces a cleaner result than heavily boosting another one.
Separate Equalizer Problems From Fit Problems
An incomplete ear-tip seal can reduce bass before the equalizer changes the sound. Check the fit of AirPods Pro models and try another included tip size before applying a large bass boost.
Clean the speaker meshes carefully if one side sounds quieter or less detailed. Dirt, moisture, or earwax can affect volume and tonal balance.
Open Settings > Accessibility > Audio & Visual and confirm that the Balance slider remains centered. If the earbuds never feel secure, review these fit considerations for earbuds designed for small ears.
Reset the Equalizer When Results Become Confusing
Return to Recommended or place all three Custom controls in their neutral positions. Replay your reference track before making another adjustment.
Restart the iPhone and reconnect the AirPods if the controls stop responding. Confirm that the iPhone still sends audio to the AirPods.
If playback pauses during testing, Automatic Ear Detection may have lost contact with your ear. Follow these instructions for turning off Automatic Ear Detection temporarily during troubleshooting.
Frequently Asked Questions
Can You Use Custom EQ With Every AirPods Model?
No. Current reports list AirPods Pro 2, AirPods Pro 3, AirPods 4, and AirPods Max 2 as compatible.
Older AirPods can continue using Apple Music presets and Headphone Accommodations. However, they may not receive the dedicated three-band control.
Does the AirPods Equalizer Work Outside Apple Music?
Apple describes Custom EQ as a way to personalize how compatible AirPods represent any audio played. This makes it broader than the equalizer inside Apple Music.
Apple Music EQ changes playback within the Music application. AirPods Custom EQ connects the selected sound profile to supported AirPods settings.
Why Can’t I Find the Equalizer Setting?
Confirm that your iPhone runs iOS 27 and your AirPods have compatible firmware. Wear and connect the AirPods before opening their complete settings menu.
The feature may not appear on unsupported models. Its availability may also change while iOS 27 remains in beta.
What Are the Best AirPods EQ Settings?
No single profile works for every listener, genre, ear shape, or listening level. Start with Recommended and make one small change at a time.
Reduce Low when bass overwhelms vocals. Reduce High when cymbals sound piercing, and adjust Mid carefully when speech needs more presence.
Can Custom EQ Improve Podcast Dialogue?
A small Mid increase may make dialogue more prominent. A slight Low reduction can also remove excessive warmth from deep voices.
Avoid large Mid boosts because they can make speech sound nasal. Test several speakers and podcast recordings before keeping the profile.
Can Custom EQ Damage AirPods?
Changing equalizer settings will not normally damage the AirPods. However, strong boosts combined with high volume can create distortion and increase listening fatigue.
Use moderate adjustments and a comfortable volume. Return to Recommended when the customized sound becomes harsh or uncomfortable.
Is Custom EQ the Same as Adaptive EQ?
No. Custom EQ gives the listener direct control over low, mid, and high frequencies.
Adaptive EQ automatically adjusts aspects of playback based on the AirPods design and fit. Adaptive Audio performs another function by controlling environmental sound through Transparency and Active Noise Cancelation.
Final Thoughts
Apple’s AirPods equalizer provides a useful way to personalize sound without depending entirely on streaming application presets. The Low and High sliders offer the most predictable adjustments, while the Mid control requires smaller and more careful changes because its center frequency shifts between boosts and cuts. Start with Recommended, disable other equalizers, check the physical fit, and test familiar recordings at a consistent volume before keeping a new profile.
Custom EQ does not provide the precision of a professional multiband equalizer, and Apple’s interface still lacks numerical values and detailed frequency controls. However, it gives supported AirPods owners enough flexibility to reduce excessive bass, improve speech clarity, or soften tiring treble across music, podcasts, movies, and calls. Careful adjustments can improve comfort while preserving the recognizable character of Apple’s original AirPods tuning.